
Convert window contact as a doorbell detector in theory …
We could either tap into the sabotage button or as we show in the following instructions, the reflective photosensor CNV 430 or TCND 5000, which is pulsed with a signal that we want to be reflected throughout and then interrupted via the doorbell. For this purpose we do not modify the emitter, but simply connect the detector via the bell button for a short time and thus simulate an open window at the window contact.
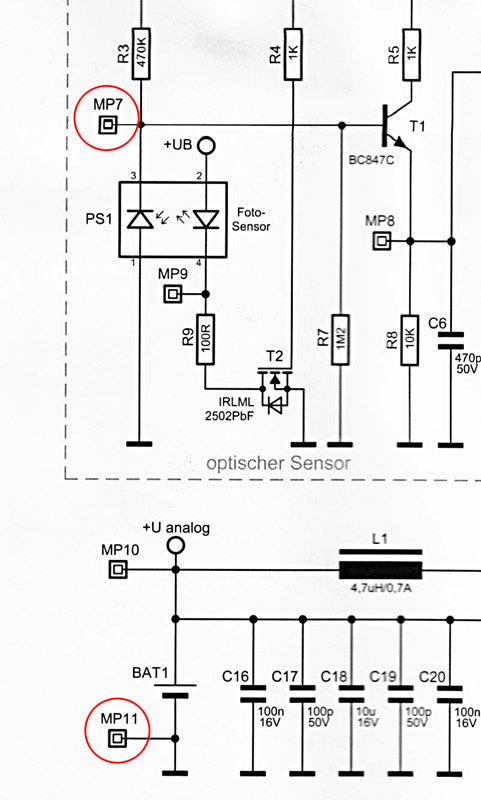
Since we are looking for simple contact points for soldering, we look at the enclosed circuit diagram to find possible test points that we can use. And lo and behold, the test point MP7 against GND offers itself for this. GND is also offered via the test point MP11, so we simply have to provide MP7 and MP11 each with a line, which is then connected to the doorbell button.
Convert window contact as doorbell detector in practice …
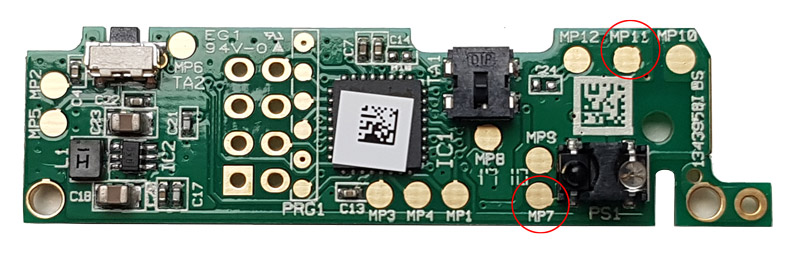
In the following picture you can see the two test points MP7 and MP11, to each of which we will solder a wire.
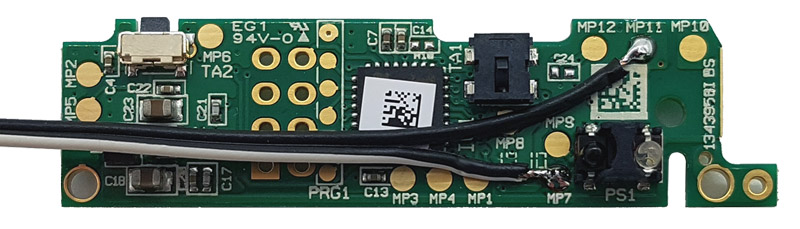
This is how the finished solder joints should look. How long the corresponding line to the bell button or to the door chime should be, everyone can measure beforehand.
Now we can almost reassemble the door/window contact. Before we can do this, we have to cut a small notch in the cover and a small piece of the acrylic glass frame to be able to lead the cable out of there.
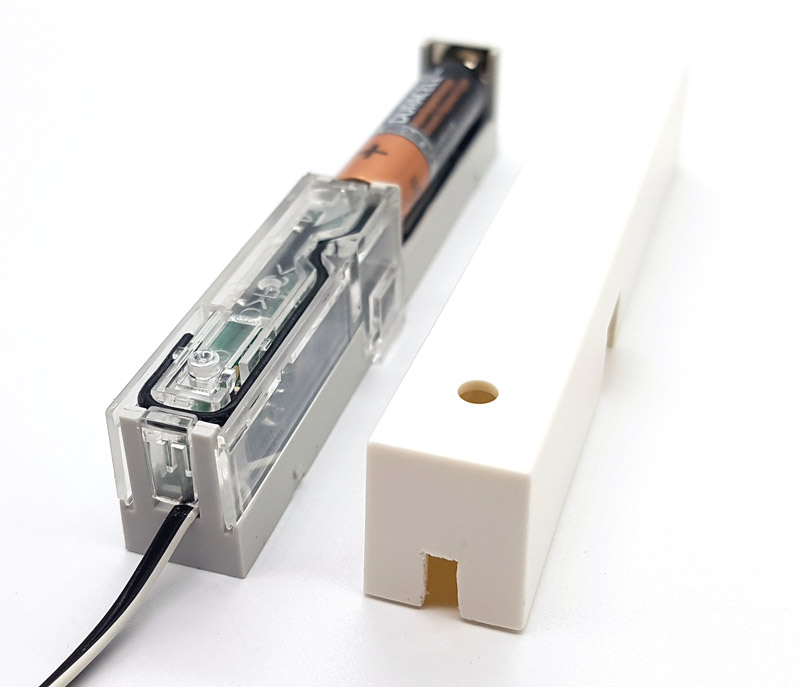
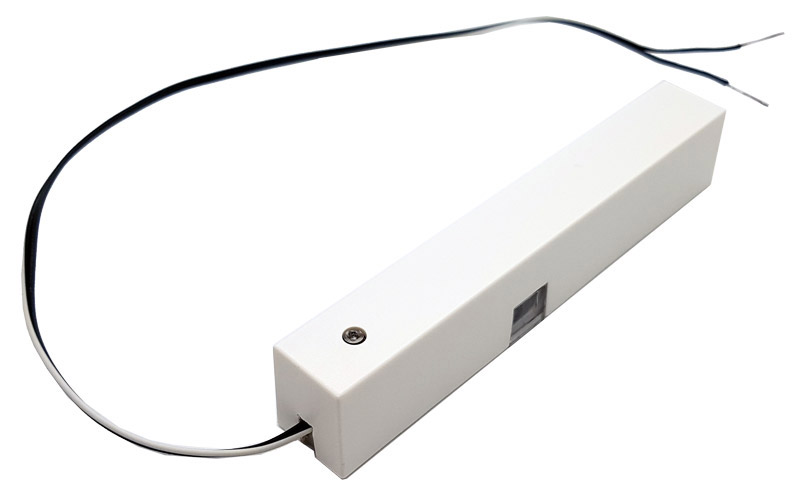
That’s it, our optical window contact with optional connection cable is ready. As mentioned before, the side opening of the photoelectric switch is now covered with the included reflector or a white piece of paper, so that the photoelectric switch is continuously reflecting.
Test the window contact as doorbell detector …
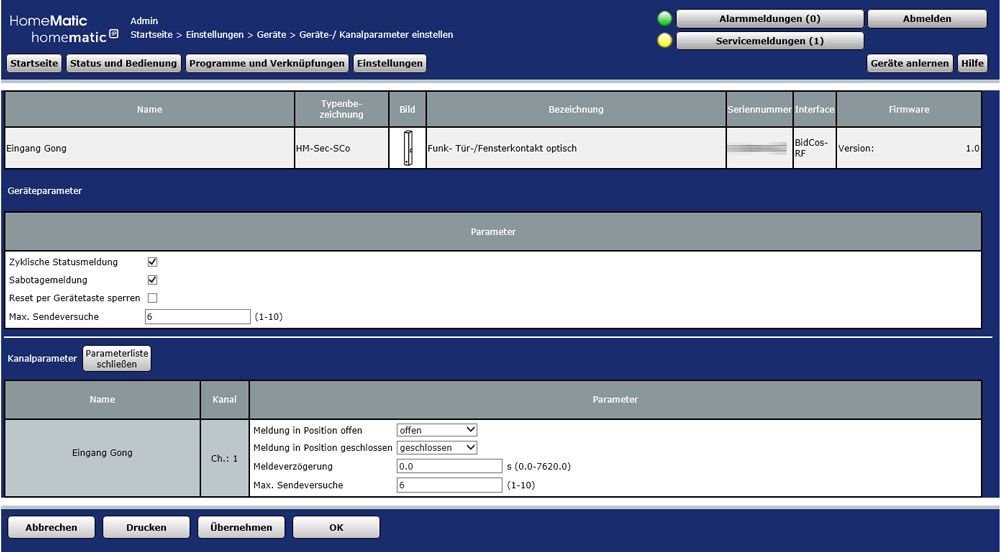
Before we connect our wireless door gong detector to the doorbell, we should test it out. First, we learn the radio door window contact to the CCU2 or CCU3 control panel. We have explained exactly how this works in this small Homematic Window Door Contact Teaching Tutorial. When teaching, set the message delay to 0 seconds and set “Message in position open” to “open” and “Message in position closed” to “closed”.
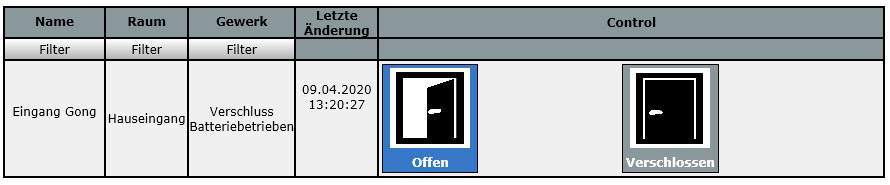
After that we go to the Homematic WebUI interface to Status and Operation -> Devices -> Select the window contact (in our case we called it Input Door Chime) and see the current state.
If the viewing window is reflectively taped shut, the window contact should report “Closed” and as soon as you connect the two cable ends, the window contact should report “Open”.
Connect window contact as doorbell sensor …
Now we can start the first test run. To do this, we now open the doorbell button.
Important note: Open the bell button necessarily carefully! If the bell button is illuminated or combined with an intercom system or as is usually installed a bell transformer in the fuse cabinet, there are power lines! It is absolutely necessary to study the documentation carefully in order not to create a short circuit, not to get an electric shock (yes, even a bell transformer can be very unpleasant) and of course not to destroy anything! We do not assume any warranty or liability, open at your own risk! Be sure to keep all seals clean and handle them with care, so that they remain dust-tight and watertight after modification.
After these cautionary notes, we continue with the connection to the correct contacts. Unfortunately, there are numerous different doorbell variations, so we can’t go into proper details. However, we are happy to help with advice and action in our forum. The best way to identify the contacts is to look at the very primitive bell buttons, which consist of simple sheet metal contacts that are connected or disconnected. With more modern systems, you should take a close look at the wiring diagram or the labels of the connection and recognize relatively quickly where the bell contact is led out. It is recommended with smaller bells the window contact doorbell detector not directly to the doorbell to attach, since this is to remain dust and splash-proof. But again, anyone can quickly tell if the doorbell detector fits inside the doorbell or if you prefer to mount the design inside on the door chime. Again, beware, there are live wires, do not touch them, even if there according to the bell transformer only 9-15V or 24V voltage is led. The doorbell detector must not be connected there under any circumstances, as this will destroy the window contact! It is best to check with a current meter before connecting.
A further characteristic is now still the kind of the pushbutton, because there are two pushbutton kinds:
– Either you have a normally open contact – this is open in the original state and is closed as soon as you press the button.
– Or you have a normally closed contact – this is closed in the original state and is opened as soon as you press the button.
The latter is the case with our doorbell pushbutton, so once connected, our window contact continuously reports that it is open and as soon as the doorbell is pressed, the state briefly changes to “Closed”. Of course we have to keep this in mind when programming, which is what we will continue with on the next page.
Programming the window contact as a doorbell …