

In the following tutorial, we will mainly show novices how to create programs for the Homematic E-Paper Display, for example to display the status of windows and shutters. A short press of the buttons will query the values and a long press will raise or lower all the roller shutters in the house.

Create programs for E-Paper status display …
Programs can be used to solve complex tasks in the Homematic CCU2 control unit and to conveniently combine several actuators. The CCU2 control unit does not even require any programming knowledge, because the desired tasks are simply selected using the graphical user interface.
In our E-Paper status display example, we create a program that allows you to recognize immediately opened windows and doors at any time at the push of a button, at the desired time or during mains operation, and to see whether all roller shutters or sunblinds are up or down. In addition, with a longer press of the button upwards all roller shutters in the house are raised and with a longer press of the button downwards all roller shutters are lowered.
Create Homematic system variable …
However, for once, we will not start with the programming in this guide. Instead, we would like to use the Homematic system variables to store the states temporarily so that they can be called up later using the Homematic program. To do this, select in the Homematic CCU2 interface Settings -> System variable.
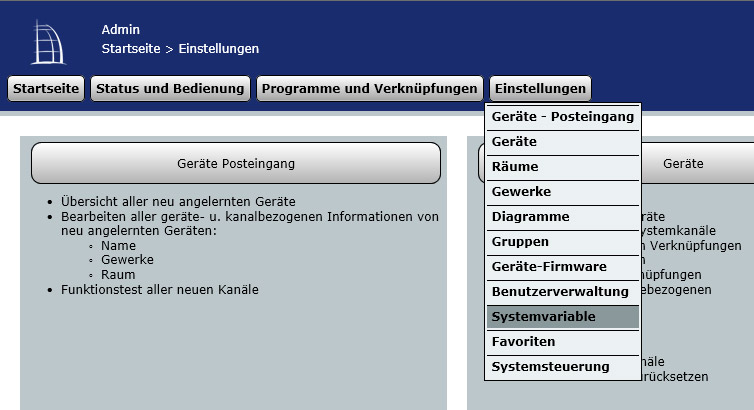
Click on the “New” button and in the following popup window enter a name such as “System Variable Window”, enter a meaningful description such as “Window Variable for Display”, select “String” as the variable type and then confirm with OK. In addition, we have also created the “Status Window” variable to store longer texts such as “Windows and doors closed”, which you can then query with your smartphone or tablet.
Write Homematic system variable with data …
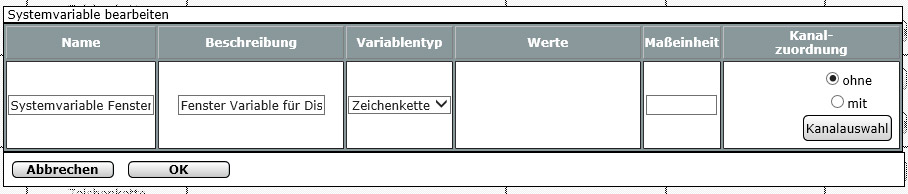
These variables can be changed with programs and this is what we will do with the following program. To program, select Programs and connections -> Programs -> New in the CCU2 interface and give it a meaningful name such as “Status and Variable Window” and, if necessary, a description such as “Write Variable and Status Window”. Afterwards you choose at the condition: If … as device selection select the desired window contact, which should change the variable. Here you can first of all simply trigger all door/window contacts when closed and link them with AND. For the activity: Then … select “System status”, as variable select “System variable window” immediately and as text e.g. “Closed”. As already mentioned, we have created a second variable in which we store the finished texts (e.g. “Windows and doors closed”), but this is optional.
Now you could simply describe the variable(s) with the text “Open” as a condition: Otherwise …, but we also want to query the status of each individual window. We do this by entering “bedroom open”, “living room closed”, “bathroom closed”, etc. in the device selection, and linking this with AND to place the text “bedroom open” or “bedroom”. Now we enter the device selection bedroom closed, living room open, bathroom open, etc. and link it with AND, in order to store the text “living room open” or “living room”. Last but not least, link them all as shown below with OR as open to create the activity: Then … with “Several open” or “Several” in the system variable. Of course, you could also fire the display with the data directly in one go, but we want to separate it cleanly.

So where is the advantage of the system variable? Quite simply, we can now query this variable at any time with any program. Of course there are many other states that can also be stored in variables. It is conceivable, for example, to query whether all lights in the house are switched off or whether all batteries of the Homematic devices are full enough or whether it is freezing outside and the pond should be heated or whether the sun is shining strongly to lower the shutters as sun protection or whether all shutters in the object have been raised or lowered. And the great thing is that you don’t have to rebuild these queries in every program, but can access the previously created system variables. A further advantage is that the system variables can also be called up conveniently via app! As already described in the Homematic CCU2 review, you can query, operate and output the Homematic devices and system variables via third-party programs or apps. If you wish, you can also have a mail or push message sent to you or an acoustic warning tone with status on the display if the windows are open for more than half an hour, etc. … the possibilities are almost unlimited.
Output Homematic system variable immediately on the status display …
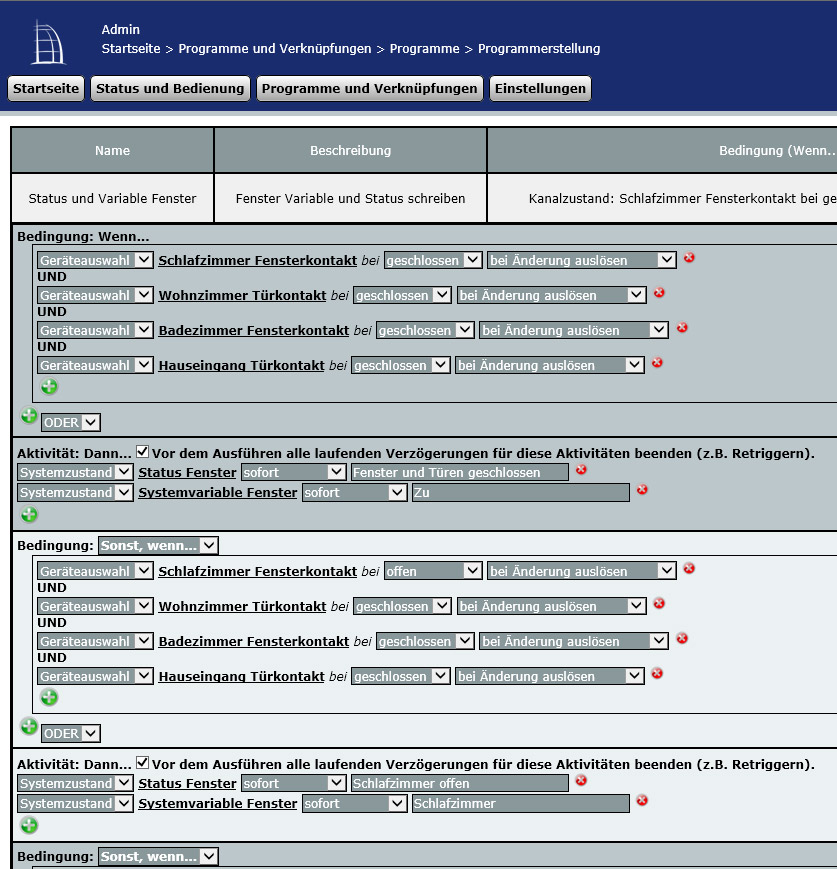
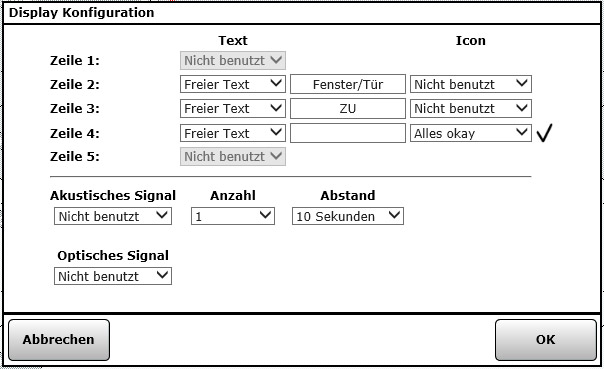
Let us now return to the programming of the status display, because the value of these system variables is now displayed on the status display. There are several possibilities: In the simplest case, we let the value appear on the display as soon as the system variable changes. For programming, select Programs and connections -> Programs -> New in the CCU2 user interface and assign a meaningful name such as “Status Variable Window to E-Paper Display” and, if necessary, a description such as “Output status from variable to E-Paper Display”. Then select at the condition: If … (click on the green plus symbol) select “System Status” and the desired variable, in our case “System Variable Window”, where the value Bathroom (or Bedroom, Living Room, etc.) will trigger when a change is made. At the activity: Then … select “Device selection” and then the E-Paper Display channel (we had called it in the Homematic Status Displays Teach-In Guide E-Paper Display 3), immediately, channel action.
Now a small popup window opens, where you can output the desired text. Line 1 and line 5 were already fixed in the Teaching Guide and unfortunately cannot be changed with a status. So we have lines 2, 3 and 4 with 12 characters each and an icon left for free use. In our example, we enter “open” in line 3 in line “bathroom” and a space in line 4, since we only want to display an icon “error” there. If you want, you can also let the LED flash or give an acoustic signal. But in our case we do not want this and set it to “not used”. If you have read the previous manual, you will remember that you can store up to 10 texts. You should use this possibility to keep the Duty Cycle as low as possible. Since this is limited by law for the 868.3 MHz radio frequency, you run the risk of sending too many signals and then cannot send any more signals with the central unit for a certain period of time – that would be the worst case scenario! In our example we send the text directly for easy understanding.

This is now given with the condition: Otherwise … for all desired queries, i.e. bedroom, living room, etc. and lets the desired text appear on the display. Don’t forget the state “Multiple” or “Closed”, which we have previously stored in the system variable when all windows and doors are closed.
It would actually be the best way to immediately display the condition of the windows, if it weren’t for the battery … because in the test we managed to get empty batteries after a few weeks.
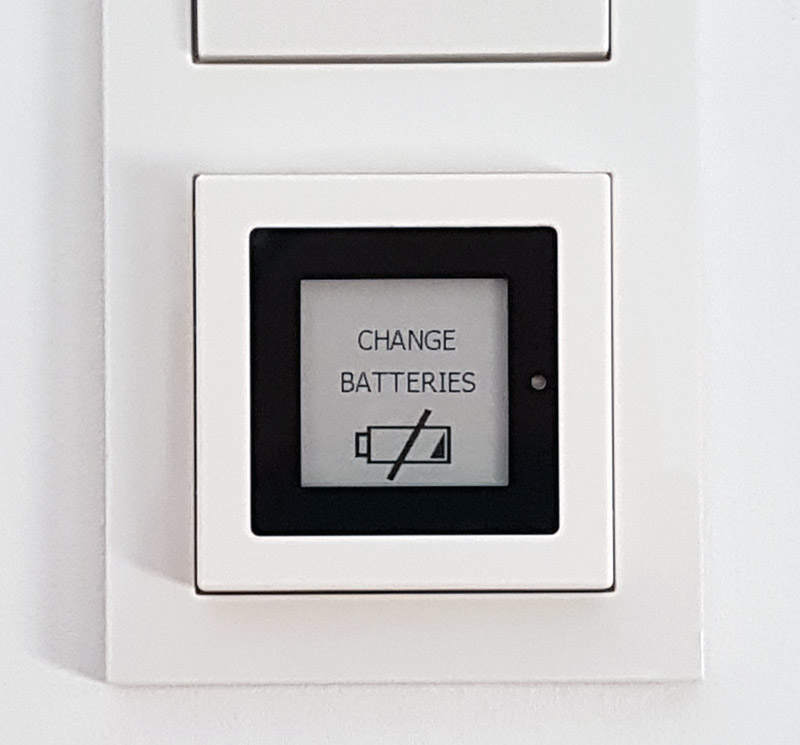
So it would make sense (at least if you did not purchase the optional ELV Homematic IP power supply *Ad) to limit the update rate in some way. Depending on your needs, it would be conceivable, for example, to have the query run hourly or every morning before going to work or every evening before going to sleep. Another solution is the status query by keystroke and we will explain this briefly in a second example.
Output homematic system variable on keystroke on the status display …
Since the Homematic E-Paper status display is equipped with an upper and a lower button, we can use it excellently for status queries. And since it is possible to query whether the buttons have been pressed long or short, we can perform different actions.
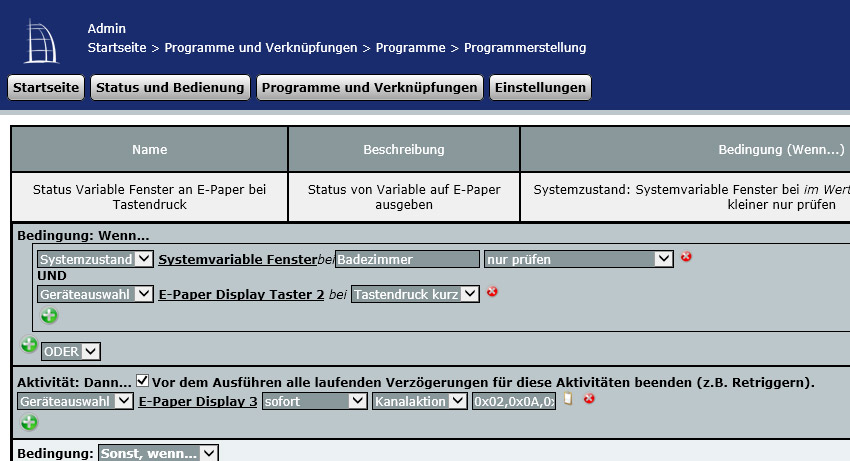
For programming, select Programs and connections -> Programs -> New in the CCU2 user interface and assign a meaningful name such as “Status Variable Window to E-Paper on keystroke” and, if necessary, a description such as “Output status of variable to E-Paper Display”. Then select at the condition: If … (click on the green plus symbol) select “System Status” and the desired variable, in our case “System Variable Window”, with the value bathroom (or bedroom, living room, etc.), but this time check only. Now with an AND briefly link the device selection E-Paper Display button 2 (this is what we had called it in the Teaching Guide) when pressing the button. At the activity: Then … select “Device selection” and then the E-Paper Display channel (we had called it in the Homematic Status Displays Teaching Guide E-Paper Display 3), immediately, channel action.
Now enter the text in the popup again as before and the text will be output upwards with a short keystroke. Ready is the status display for the windows and doors with a short keystroke upwards. So we just programmed the following 3 programs: “Status and Variable Window” for continuous writing of the system variable, then “Status Variable Window to E-Paper at keystroke” and the first attempt with the high battery consumption, which we deactivated without further ado. Of course, you don’t have to enter everything again and again, but you can also copy the programs and name them differently.

Exactly the same programming can now be created again for all shutters: So first create the system variable, then write the system variable with a program, and finally output the system variable on the display when you press the key down briefly.
Depending on the application, an acoustic warning or a flashing LED on the E-Paper status display is also a useful addition.
Output the homematic variable via script on the status display …
It is a pity that it is not (yet?) possible to output system variables directly to the display, so the programs become correspondingly long if there are several window and door contacts. This is not a tragedy, since the performance of the CCU2 is completely sufficient for this, but it is a lot of hard work and sometimes cumbersome to expand. For this reason, the E-Paper status display can alternatively be addressed via script. There are already scripts available, e.g. from DrTob or you can program the response yourself. Unfortunately in both cases it is necessary to have or to acquire at least basic programming knowledge. Let’s hope that eQ-3 will soon be improved and will allow easier solutions via the graphical interface. If you still want to control the display via script, we will be happy to help you in our Smarthome Forum which is now also available in English. Here’s our English Smarthome Forum.
Important note on Homematic programs …
Once again briefly to refresh from the Homematic Thermostat Program Tutorial:
Programs without an “if” condition must be deactivated after creation, otherwise they will be executed unintentionally, e.g. when the central unit is restarted. To do this, check the box labeled operable and visible, so that you can see and operate them in a smartphone app, for example!
The programs shown above for status display via the “If” condition, on the other hand, you want to activate and basically do not need any operation. Whether you make these programs visible and operable is up to you. However, depending on the number of programs, it can get confusing and it is recommended to make only those programs visible that you really want to use.
Tip: If you want to sort the Homematic programs alphabetically, simply go to Status and Operation -> Programs in the CCU2 control unit and the programs will be sorted alphabetically the next time you view them.
This guide to the E-Paper status display programs will be expanded over time, because there are of course many more possibilities.
We hope that this little guide will help you and if you have any questions we will of course help you in our Homematic Forum and Homematic Forum in English.
Read the Homematic E-Paper status display review …
Discuss in our forum and share experiences about the E-Paper Display Teaching Guide …
Here you can buy the Homematic E-Paper Statusanzeige as kit at a reasonable price. *Ad