
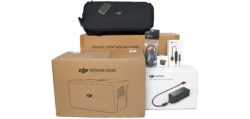
Practical testing …
DJI Power 1000 test in practice
Charging the DJI Power 1000 via the socket …
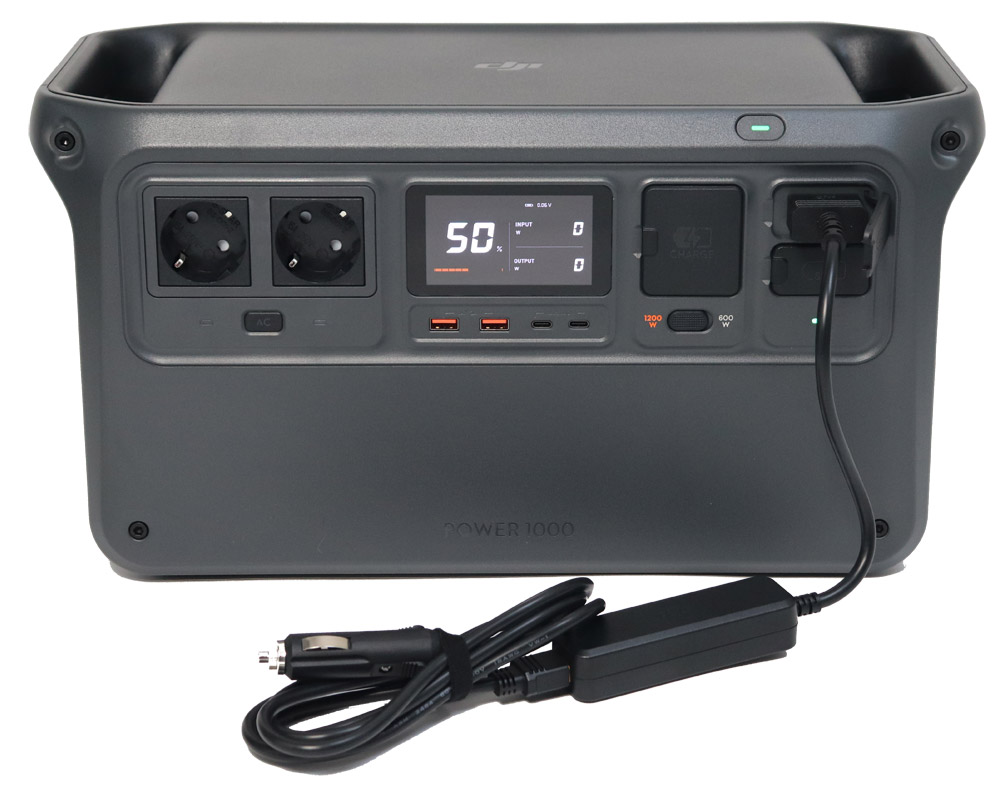
Charge DJI Power 1000 with car …
DJI Power 1000 charging …
DJI Power 1000 charging with solar …
DJI Power 1000 with fast car charging …
DJI Power 1000 charging time …
DJI Power 1000 discharge …
DJI Power 1000 output …
Connecting devices with a 12V on-board socket …
Volume when charging and discharging the power station …
Powerstation temperature …
DJI Power 1000 Efficiency …
DJI Power 1000 Powerstation Grounding …
DJI Power 1000 as UPS …
DJI Power 1000 test in practice …
After all the information about the Powerstation, let’s now move on to the actual practical testing of the DJI Power 1000 Powerstation. We have been using the Powerstation continuously for some time now and have already been able to gather experience that will certainly be helpful for many people.
Charging the DJI Power 1000 via the socket …
The Powerstation battery is usually pre-charged to just under 50%. The charging speed via the 230V AC input can be increased from 600W to 1200W using the front selector switch. Provided the room temperature is not too low (see here in the DJI Power 1000 video).
Incidentally, there is no setting for the 230V AC charging speed in the DJI app. In any case, you first need the optionally available DJI Power Dongle, as this is the only way to enable the app connection. For further settings of any kind, you must first install and set up the Power Dongle. Only then can you install and set up the DJI app in order to establish a connection via Wi-Fi and/or Bluetooth.
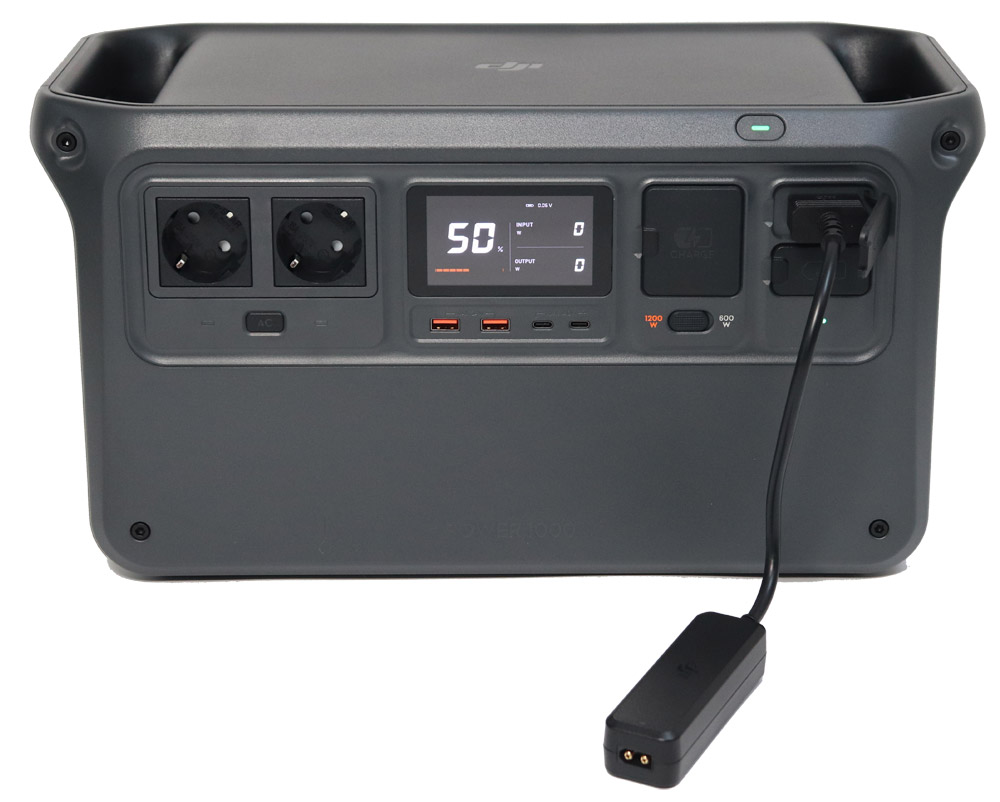
Connect the power cable and charge …
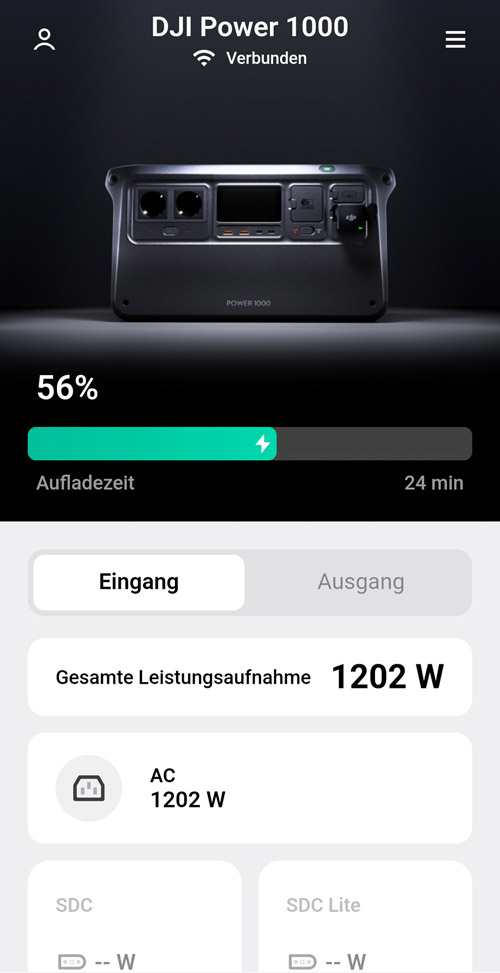
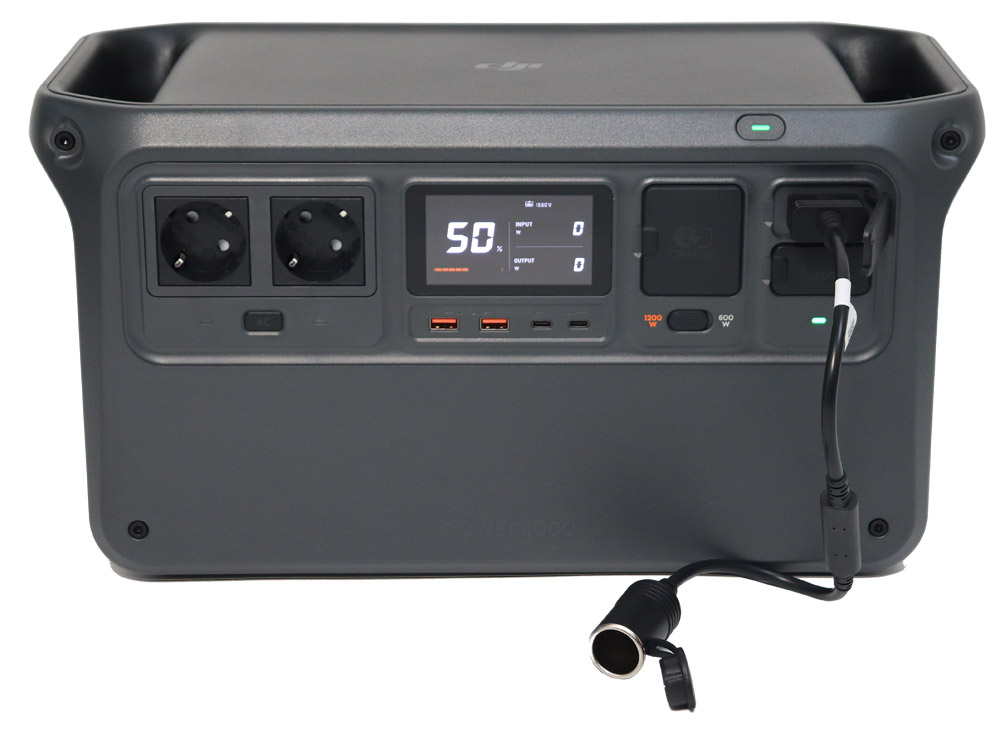
There are several ways to charge the Power 1000. The easiest way is to plug the Powerstation into the front C14 connection behind the protective cap using the supplied power cable with the C13 socket and then connect the earthed plug to the socket. The power station switches on automatically and shows the current charging status on the display. The LED on the power button lights up green. The display switches off after a few seconds and can be reactivated at any time by briefly pressing the power button.
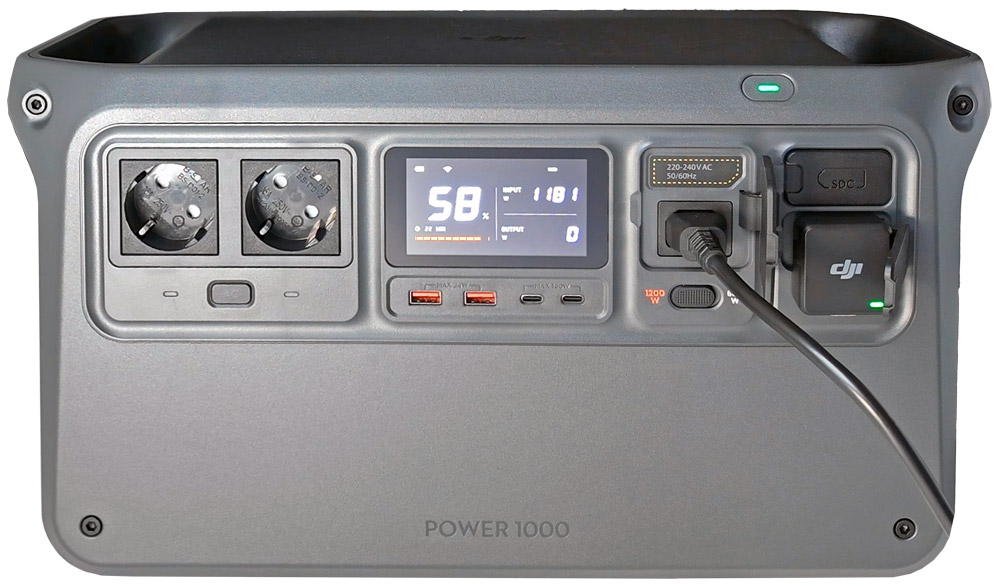
For the pure AC charging process, only the connection of the supplied power cable is necessary. For everything else, you need optional DJI accessories for the SDC Port and the SDC Lite Port, so that you can set up the desired modular system for the respective application.
Charging with the vehicle …
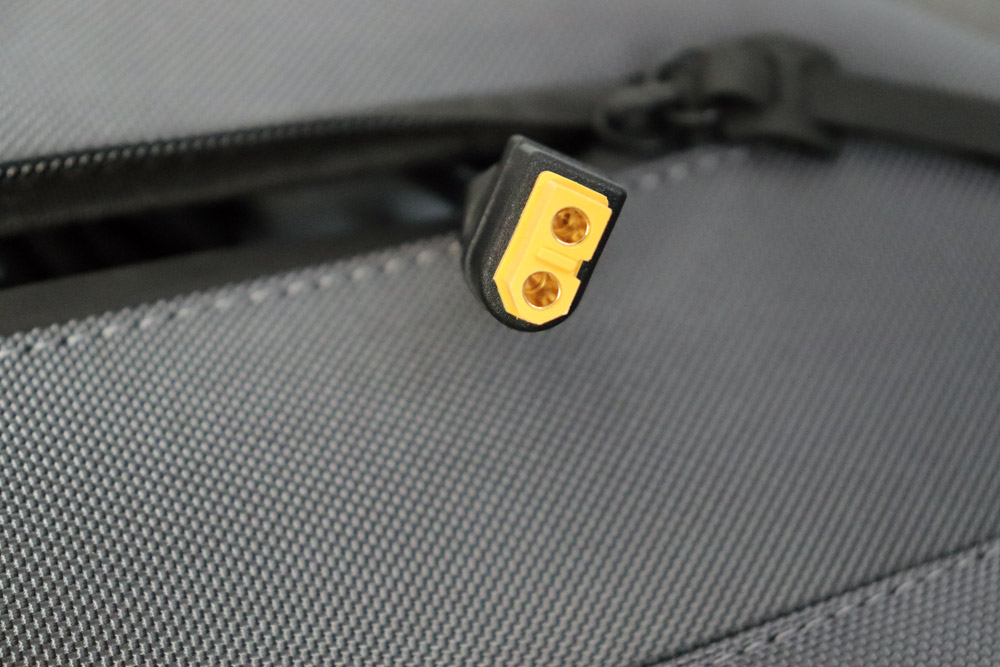
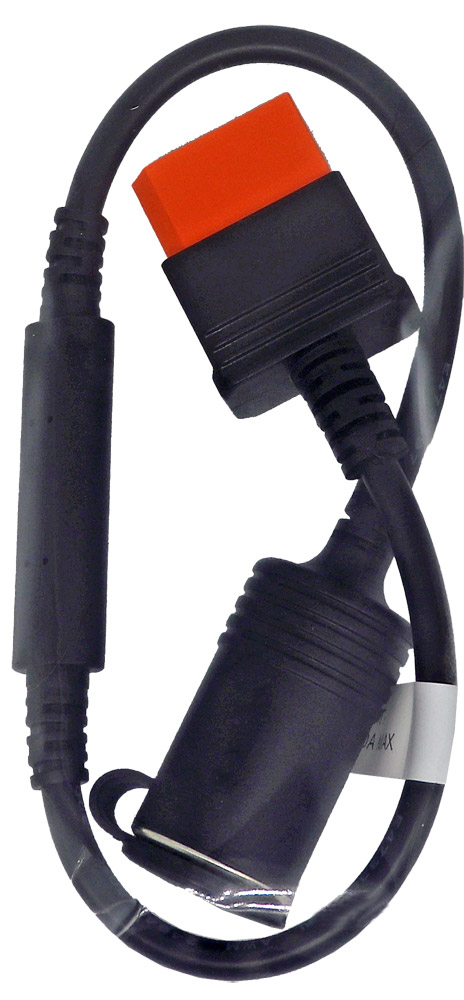
To charge the Power 1000 with the car, you need the DJI Power car socket to SDC power cable, which we have already explained on the introductory page and the following pages.

As soon as it is plugged into the upper SDC port at the front (be sure to switch off the Powerstation beforehand!) and the charging plug is plugged into the 12-volt vehicle socket, the Power 1000 starts charging with up to 100 watts. The above-mentioned power dongle and the Home app are required to adjust the car charging power.
Charging with a solar panel …
Solar charging is also not possible without optionally available aids. An ordinary solar panel normally has MC-4 plugs. The mobile Zignes 120 W solar panel …
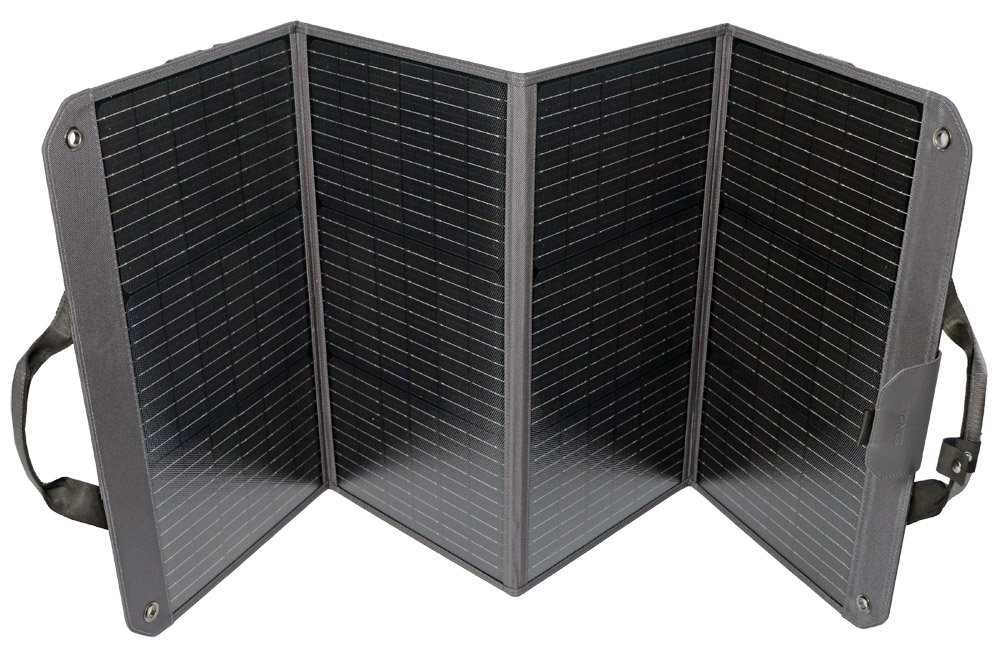
… does not have an SDC connection, but an XT60 connection, which we also use here in the DJI Power 1000 review video on the solar panel.
This XT60 plug can then be plugged into the aforementioned DJI Power car socket to SDC power cable, for example. However, the charge is then limited to a maximum of 100 watts! If you want more, you need the slightly more expensive DJI Power adapter module for solar panels (MPPT), which allows you to charge up to 200 watts per channel. So you can clearly see that the application here is more for mobile use and not for a stationary installation as a solar generator. But we will soon be testing an interesting solution for this on Funkyhome.de.
Attention: Anyone thinking about simply connecting their balcony power station with its own micro inverter to the front socket, for example, should immediately discard this idea! This is because the 230V AC output must never be used as an AC input! The design with a balcony power station on the power station would only work as long as the power consumption of the connected devices continuously exceeds the yield of the solar panels or the inverter and therefore no power is supplied via the front AC output. As soon as this current consumption is even briefly below this level, current would be fed into the output, inevitably destroying the power station! So don’t do it under any circumstances!
With vehicle fast charging …
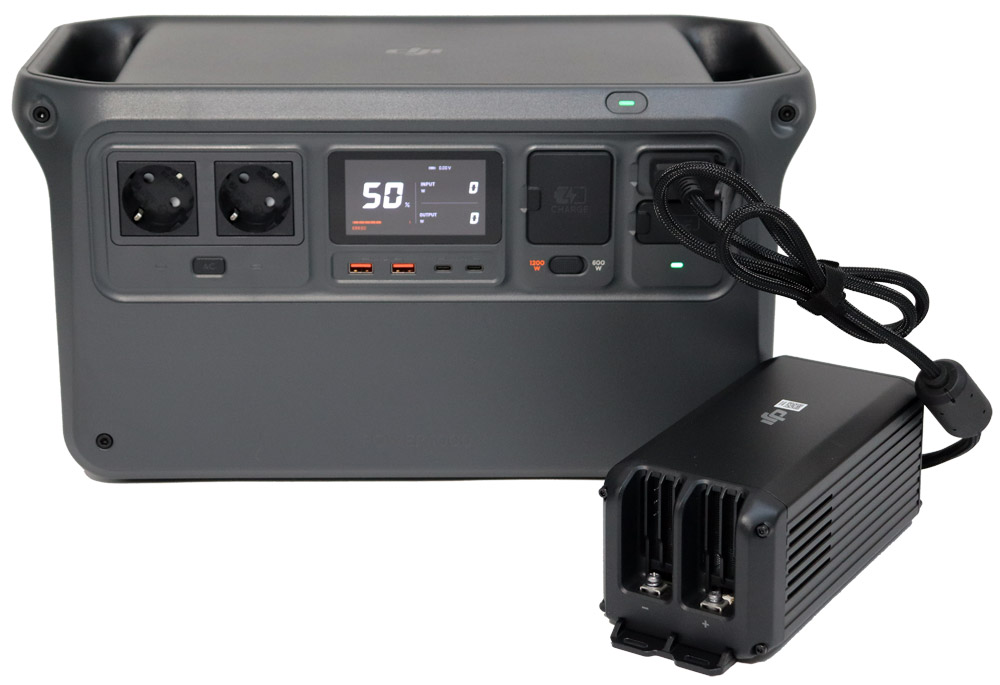
If you want to recharge faster by car or camper, you can do this using the DJI Power 1 kW Auto Super fast charger, for example. This is not limited to the 100 watts of the on-board socket, but is connected directly to the on-board power supply using the enclosed instructions.
It is protected by the included 100A fuse, among other things. Nevertheless, you should find out whether it is suitable for the vehicle and what needs to be taken into account before installing it.
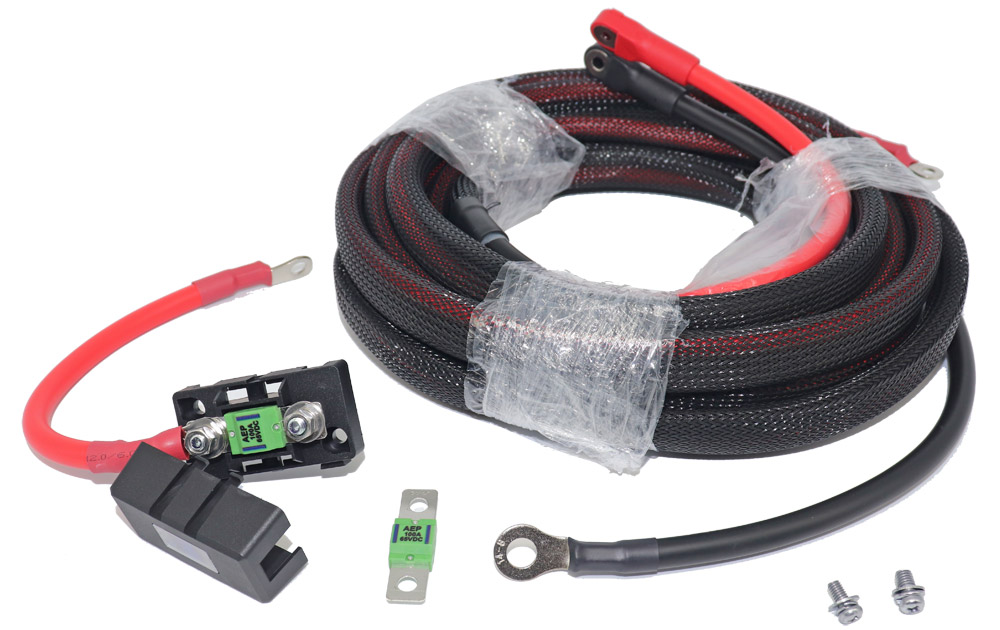
The great thing about the DJI Power 1 kW Auto Super fast charger is that it can be used not only for charging, but also for discharging by pressing the charging button. The LED shows you whether you are charging the vehicle or the power station.
DJI Power 1000 charging time …
Depending on the charging power, the complete charging process takes from approx. 1 hour using a 230 V socket to just under 1.5 hours with the DJI Power 1 kW Auto Super fast charger and up to approx. 10 hours using a 100 watt car/solar charger. These are excellent values and can be optimized depending on the exact use.
This brings us to unloading …
DJI Power 1000 discharging …
Now we have loaded the DJI Power 1000 Powerstation with different current draws to see whether it really achieves the specified performance. First, we tested the USB-A and USB-C ports, which are activated when the Powerstation is switched on. No separate power button was integrated for this purpose.
DJI Power 1000 output …
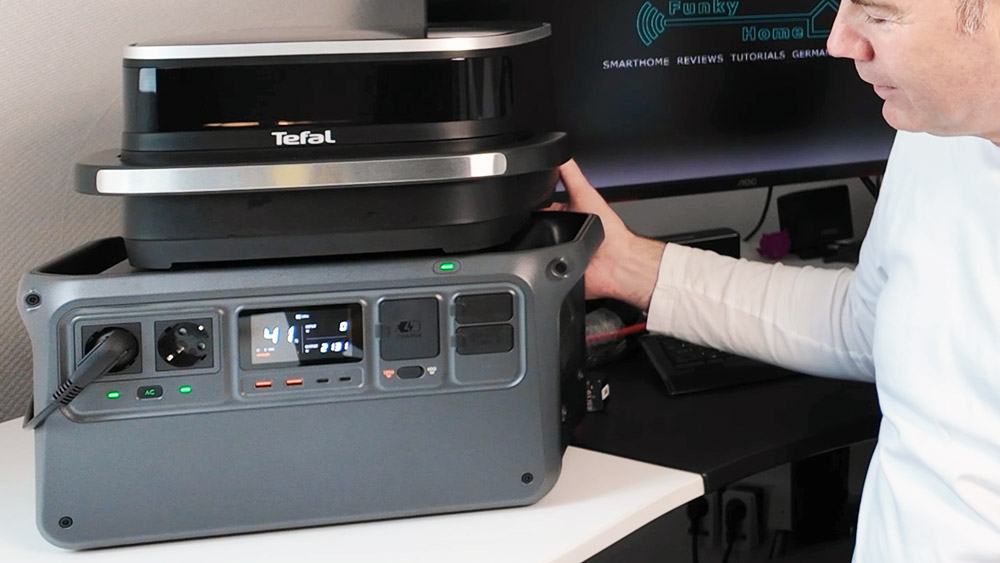
According to DJI, the peak AC output power is even 4400 watts for a short time and the AC continuous output power of the DJI Power 1000 Powerstation, which is decisive for us, is 2200 watts at a room temperature of 25° C. The power of 2200 watts is also delivered via the power station without any problems, as we were able to demonstrate with the AirFryer at approx. 2200 watts, for example.
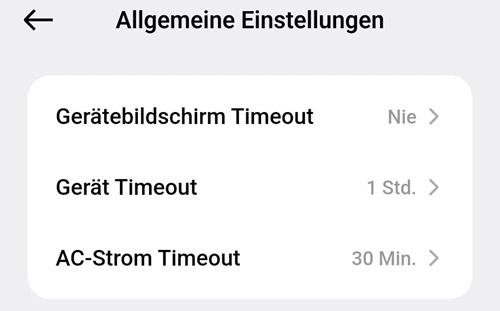
Before you can use the AC output, you must first switch on the power station by pressing and holding the power button on the top edge of the housing and then switch on the AC output by briefly pressing the button next to the earthed socket. The AC output is deactivated after a certain time, which can be set in the DJI Home app from 30 minutes to 1, 3, 5 and 12 hours to never. The Powerstation also switches itself off after a certain time. This device timeout can also be set in the app from 30 minutes to 1, 3, 5 and 12 hours to Never, whereby the Never then of course ends at the latest at the maximum discharge limit that you have previously set in the app settings. This should be around 15-20%. To maintain the Powerstation battery, you should occasionally discharge it to approx. 15%, switch it off for approx. 2 hours and then fully charge it to 100% in slow 600W mode. Under no circumstances should the battery be completely discharged and then left empty, as deep discharge would lead to a defect in the battery cells.
Incidentally, there is no such thing as an X-Boost. You can therefore directly connect an appliance with the specified power. Even a washing machine, radiator and hair dryer can generally be used at the AC output of this power station without the power station running into an error. However, the 1024 Wh capacity (minus the charging and discharging limit) for a washing machine can be quite tight depending on the washing program. But you can check this beforehand in the washing machine documentation.
As we could not find any information in the manual as to whether the DJI Power 1000 really supplies 230V 50Hz pure sine wave, we checked the AC output a little more closely. Because if you want to use the Powerstation to operate devices with an electronic power supply, you really should have a pure sine wave signal at the AC output. And if you use devices with a primitive clock (e.g. in the oven) that use a mains frequency as a time base, this mains frequency should be as close as possible to 50 Hertz (Europe) or 60 Hertz (USA). The output voltage, on the other hand, is not quite as important and may be 230 volts with a deviation of +- 10 percent. A voltage range of 207 volts to 253 volts would therefore be permissible.
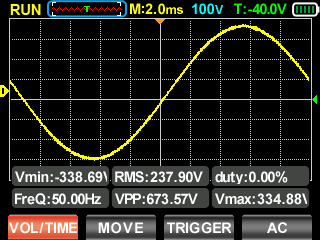
Let’s start by measuring the current signal via an oscilloscope to determine whether it is a clean sine wave – i.e. a pure sine wave or a square, modified sine wave, which should be as smooth as possible for devices with electronic power supplies. Fortunately, as we can see at first glance, a sine wave signal is output via the DJI Power 1000 230V AC output.
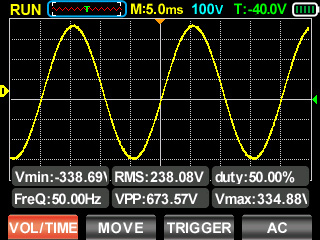
Even on closer inspection, you can see that it is a clean sine wave that could hardly be better shaped. The frequency, which according to the oscilloscope is exactly 50.00 Hz, is also very well done.
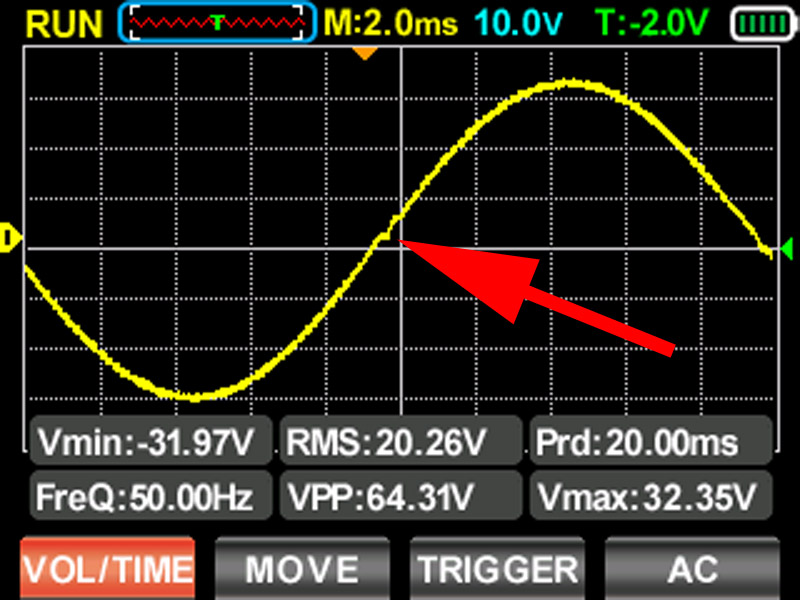
To get a small comparison to another power station, here is a measurement of the Power Queen P300W, where the sine curve has a very small corner, which is not noticeable during operation.
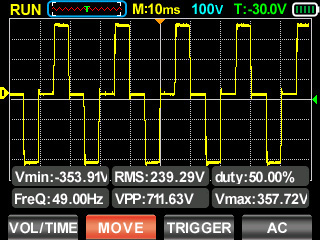
It would be more tragic if, as with this Eaton Ellipse Pro DIN 1200VA UPS, for example, it was just a modified sine wave. Because then you would have to check the usability of each device before connecting it. Fortunately, the DJI Power 1000 Powerstation provides a clean sine wave output.
Let us now return to the DJI Power 1000, because we have also checked the output voltage and see almost exactly 230 volts, which hardly changes with and without load. The voltage is therefore completely within the prescribed voltage range of 207 volts to 253 volts.
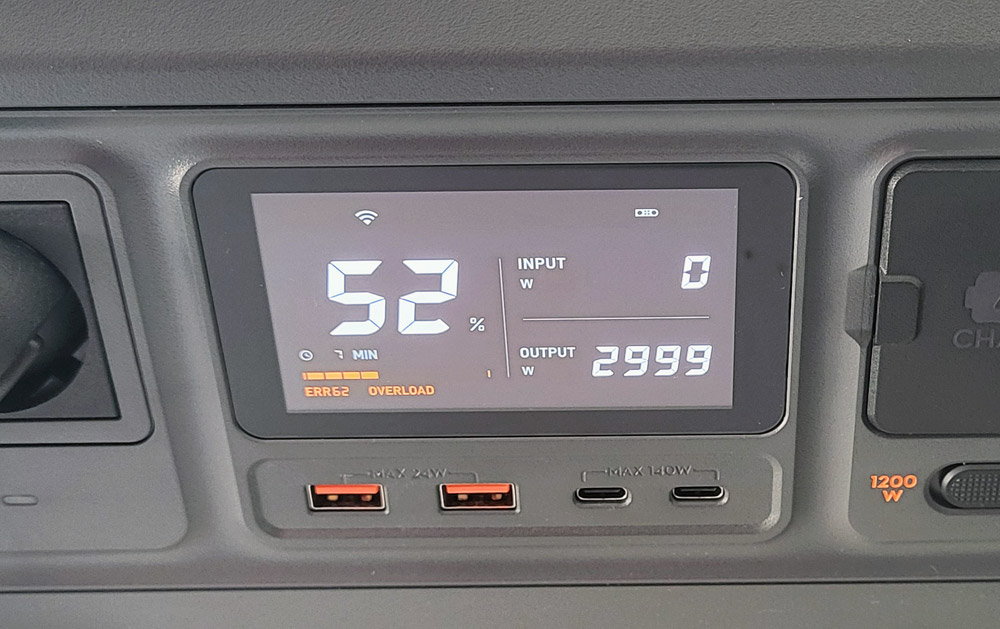
As previously mentioned, the maximum continuous output power is a very high 2200 watts. Of course, we also wanted to see how the Power 1000 reacts when the output exceeds the maximum power and were able to switch off the system from a load of 3000 watts of power. The DJI Power 1000 acknowledged the AC output from approx. 3000 watts with ERR62 overload – that’s how it should be!
Connect devices with 12V on-board socket …
Of course, you can not only use the two AC outputs and the four USB ports, but also purchase any number of optional accessories for the two SDC connections. For example, if you want to operate a thermoelectric cooler on the road, you could order the DJI Power SDC for car charging plug at a reasonable price.
This is also connected to a free SDC port. We were unable to find an official specification for the maximum power, but this is usually around 100-120 watts. The advantage of 12-volt operation as opposed to operation from a 230V AC socket is that the direct current from the battery does not have to be modulated into alternating voltage via the inverter. This reduces the energy loss. This extends the battery life enormously and therefore also reduces the volume. You should therefore always make sure that you avoid unnecessary detours as far as possible.
Volume when charging the Powerstation …
This brings us to the DJI Power 1000 volume. It is very positive to note that only a very low fan speed was required when charging the DJI Power 1000 and the entire charging process was therefore almost silent. Here you can listen to the DJI Power 1000 charging process. It only becomes a little more audible when operating the output, but it is still very pleasant. Here you can listen to the DJI Power 1000 unloading process and here is another DJI Power 1000 audio sample with AirFryer, which requires about 2200 watts of power.
DJI Power 1000 Powerstation Temperature …
The battery itself is not actively cooled by the fans. However, it is important that the temperature of the components in the inverter and rectifier remain cool at all times and this is achieved really quietly with the integrated fans. The fans are controlled based on the actual demand. This significantly reduces the noise level. Incidentally, a battery must not become too cool, as this would reduce performance and efficiency enormously. This is particularly important for outdoor use. The discharge temperature should be between -10 and +45°C. The charging temperature should be between 0 and +45°C. However, it should be noted that the discharging and charging performance will be reduced if the temperature is too low or too high. Around 25°C would be the optimum temperature for this Powerstation with LFP battery from DJI.
DJI Power 1000 Efficiency …
During discharge, we were able to elicit a maximum runtime of 32 minutes from the 1024 Wh (watt hours) battery with a load of approx. 2100 watts (enough for fries 😉 ), until the Powerstation reached its minimum charge level and automatically switched off. Equal to approx. 922 Wh and thus a discharge efficiency of approx. 90 percent. Strictly speaking, however, we initially needed 1120 Wh of energy to fully charge the 1024 Wh battery, which means we can calculate a charging efficiency of around 91%. Including charging and discharging at 1024 watts of power, we still get a Efficiency of approx. 82 percent. Every voltage conversion is accompanied by a loss. This is also noticeable if the power station is only operated with a low load. Unfortunately, the efficiency always drops considerably. If you only charge your smartphone with a few watts, the efficiency could even be well below 70%.
DJI Power 1000 Powerstation Grounding …
Speaking of stand-alone solutions, the connected devices are logically only earthed if a power station is also connected to an earth connection. This would therefore not be the case with pure solar panel operation. If you need a proper protective earth conductor, you could also use a mobile earth spike or at least connect the protective earth conductor in the house, for example by using a socket outlet with a switch where the earthing still remains looped through. However, it is not always advisable to ensure earthing/potential equalization (keyword potential-free). As the earthing of appliances is an important topic and cannot be summarized in a few sentences, it is essential to obtain more detailed information depending on the application and to contact a qualified electrician to find out which exact earthing measures are necessary and suitable.
DJI Power 1000 Powerstation as UPS …
Another special feature is the operation of a power station as a UPS. As mentioned in the Practical testing, when the power station is connected to a socket, the power is fed directly to the integrated Schuko sockets and the battery only kicks in as soon as the power fails. Fortunately, this happens in less than 20 ms! Depending on the UPS application, such as use for a PC, with a CPAP device, as an emergency power supply for an aquarium or operation on a refrigerator would be perfectly conceivable. We can only hope that the power supply in Germany will remain stable in the future, but just in case, a fully charged power station or even a stand-alone solution with a PV module is certainly not just good for preppers. Better to have than to need 😀
We did the test and connected a PC with a power requirement of approx. 350 watts. We didn’t notice any interruption when we suddenly pulled the plug out of the socket, because the PC was already running via the power station.
The application possibilities of the DJI Power 1000 Powerstation know almost no limits when it comes to the variety of connection options. The values measured in our extensive practical tests were all in the green range and are certainly impressive. We would now like to slowly but surely come to the end and present our conclusion on the DJI Power 1000 Powerstation on the next page.
Now we come to the DJI Power 1000 Powerstation result and general impression…